Ease The Surveillance Task With Arlo Camera Setup
Discover simple instructions for Arlo camera setup.
Ease The Surveillance Task With Arlo Camera Setup
Discover simple instructions for Arlo camera setup.
ARLO Camera Setup
Renowned for its amazing functionality, the Arlo camera is a security camera. You can guarantee your family’s and your property’s absolute confidentiality with this camera. You have to proceed with the ARLO Camera Setup if you would like to make the most of this camera. Arlo camera performance will be at its best with an appropriate ARLO Account Setup.
All that’s required to accomplish Arlo security camera setup is logging into its user interface. Accurately adjusting the camera’s settings is possible through the user interface. The only way to use the device’s camera is through the user interface. Through the interface, you can also activate Arlo’s motion detection functionality. It is therefore imperative that you log into the user interface.
It is necessary that you continue with the Arlo setup after completing the Arlo installation. Using the Arlo app, Performing Arlo setup is simple. The settings of the camera can be precisely adjusted from the app. The following are the ARLO camera setup steps, if you are looking for the steps to perform how to setup arlo cameras:
- First, in order to continue with the process to Setup Arlo Camera, download the Arlo application to your handheld device.
- Start the program, then log in with your account details.
- Now, select Cameras from the list available devices in the application’s menu by clicking the Add Device option.
- It is imperative that you determine the correct camera model from the inventory.
- You’ll receive instructions on how to place the SIM card into the camera from the smartphone application following this.
- The instructions don’t need to be followed if you connect the camera directly to WiFi.
- Once that is done, choose your router’s WiFi network and input the appropriate passcode.
- Allow a certain amount of time for the camera to establish a reliable WiFi connection.
- It is necessary for you to scan the QR code that the Arlo camera app displays.
- The camera will finally chime to let you know that it has successfully read the QR code.
Common Issue For ARLO Camera Setup
When performing Setup Arlo Camera then users might face some common issues while completing Arlo setup, some of them are:
- Network trouble: Users experience challenges mounting their Arlos as a consequence of connectivity problems. For the connection to operate, make sure that your phone and camera are linked to the same network.
- Erroneous QR code reading: If the code in the QR code wasn’t successfully detected by your phone’s camera, you’ll have to go back and try again.
- Bug or Temporary Glitch: If it turns out that your Arlo camera has malfunctioned during Arlo setup, it fails to link to the mobile application. To attempt resetting it, take your camera out of the Arlo mobile app and then add it back.
- Hardware Fault: The camera may not be allowed to connect as a result of a problem with your mobile device. Before trying to reconnect, be sure you restart your smartphone.
ARLO Camera Set up via Manual Process
Thus, in case you’re searching for the Arlo Camera Setup procedure, adhere to the instructions that are outlined below:
- The first, and most important, step in performing Arlo setup involves figuring out an appropriate spot for your digital camera so that you have access to the area you want to keep safe.
- Make sure your camera’s batteries are completely charged before using it. Open the container and inspect the model of the camera for instructions on doing this.
- Take out all of the additional parts that came with your camera, including the power adapter and all of the cables that link up, including the Ethernet cable.
- Begin adding and integrating cameras with the help of the app’s add device feature.
- To perform ARLO Base Station Setup and connect the camera, comply with the directions; to do so, scan the QR code.
- Choose the wifi network you would prefer to connect your device to, type the code, and then move ahead.
- Setting up an internet connection will take a little while. Viewing your camera stream will be possible after you’re connected.
- By changing the settings for motion and sensor activity, you can control everything around you.
- Keep in mind to test your camera’s functioning, after you are done with the Arlo setup.
- Now check and accomplish Arlo base station setup, include your camera, and connect to a wifi connection. You must additionally download the Arlo app to your device.
- Make sure you register with a verified email address if you haven’t previously established a user account with Arlo.
- Open the app and complete the login process after creating an account.In the event that you have already registered, all you have to do to log in is enter the password and the verified email.
How To Setup ARLO Camera via WPS?
Below given are the ARLO Account Setup through the WPS
- Open the Arlo Secure Application.
- Press the Add New Device button.
- Choose the Arlo device that you own.
- Choose the model of Arlo that you possess.
- Pay attention to the in-app directions.
- On the Connect without SmartHub screen, Arlo will indicate whether or not you have a Base Station or SmartHub.
- Select “Continue” from the “Connect to a 2.4 GHz network” prompt.
- To finish configuring your smartphone, adhere to the in-app directions.

ARLO Account Setup Through The ARLO App
You must log into the Arlo safe app in order to add your device, now that you have been aware of the benefits it provides. The following are the steps to login:
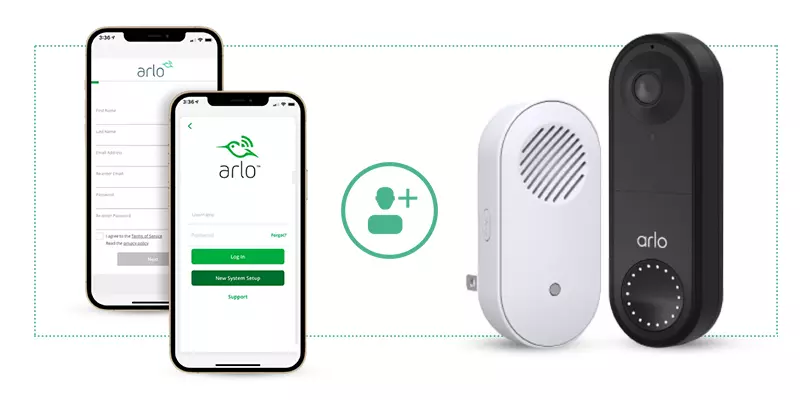
- On your mobile device, first download and install the Arlo app.
- Go ahead and create an account by launching the application that you downloaded.
- Entering your email address and phone number is all that needs to be entered.
- Proceed to log into your account immediately following this.
- Select ‘Add New Device’ from the menu in the upper right corner.
- At this point, choose the device to add and its model.
- The ARLO Camera Setup is finally possible if you follow the directions given on the screen.
- The Arlo Safe login instructions are as follows. You are now able to precisely execute Setup Arlo Camera.
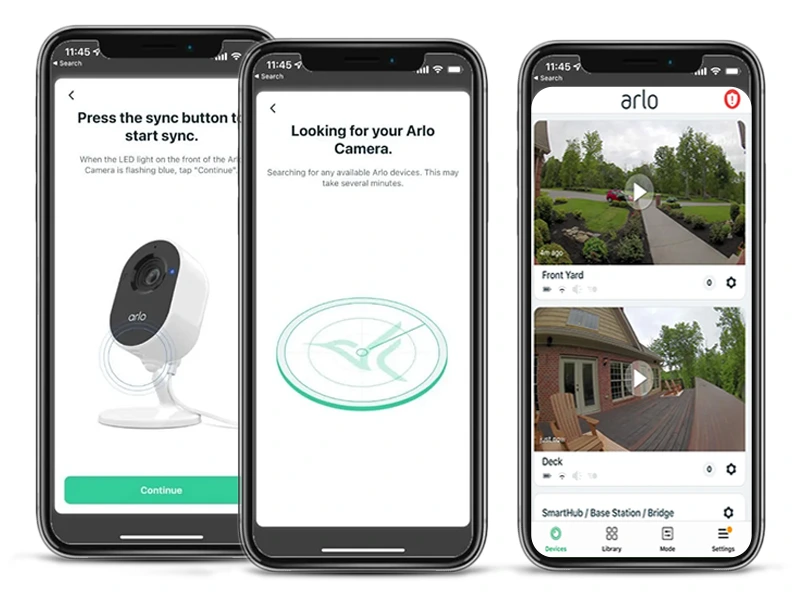
Troubleshooting Issue For ARLO Camera Setup
If you have moved to a new router or your camera is offline, you can push the sync button on the Arlo SmartHub station.
- Replacing the batteries with their original state would be an alternative. Just keep an eye out for the following activity of the camera’s LED while performing this.
- If the LED doesn’t light up at all, make sure the batteries are inserted correctly.
- The camera has synchronised with the base station if the LED begins to blink blue.
- Should the camera only blink blue once, kindly resync it with the base station.
- Additionally, it indicates that the batteries need to be changed right away if it blinks Amber.
- Simply make sure the camera has been connected and attempt to position it so that it is at a minimum distance from the base station’s location. It will begin to display problems in its operation otherwise.
- Keep checking the Arlo SmartHub or base station on a regular basis. If the internet LED on the base station is solid green, it means that it is connected to the internet.
- If the station displays an amber light, it means that it is not connected to the Internet.
How To Reset Arlo Camera?
Arlo cameras and other surveillance equipment are only valuable for as long as they are maintained. You could experience difficulties using them if they break down for causes that are beyond your control. While you may follow procedures to fix problems, there are situations in which doing so is insufficient. Acquiring knowledge about how to reset an Arlo camera can be advantageous if you find yourself in an identical situation while performing Arlo Camera setup. Consequently, in order to join your camera back to the Arlo account, you have to start the whole Arlo Camera setup procedure over each time you reset your cameras. Pressing the Sync button on your camera is an additional method of restarting the device. Knowing where it is and following the instructions below will allow you to use it:
- Find the Sync button on the camera by unmounting it from its mounting bracket. The placement of the same may differ based on the model you own. In the case of models, the Sync button is located underneath the outer shell. On the other hand, the same is positioned at the top of models such as the Essential wire-free and others.
- For approximately fifteen seconds, continue pressing and holding the synchronisation key. When the camera’s LED starts to blink blue, press and hold the button. For instance, the camera LED on some models, like the Essential Wire-Free, may blink a total of three times in orange prior to blinking blue. Release the button when it has done so.
- Wait until the RESET process is complete. It could finish in between 15 and 45 seconds.
- After the procedure is finished, you can use the Arlo Account through the app or through the website my.arlo.com.
- After selecting Settings, navigate to the My Devices area of the account.
- After choosing the camera name to reset, press the Remove Device button.
- Click the Yes button once more from the confirmation prompt that displays on the screen.
- Select the Add New Device option after returning to the Devices page.
- For the purpose of reconnecting it to the WiFi and Base Station, pick the Arlo device and model that you wish to add, then comply with the instructions.
- You can resume using the same when you remount the camera in its original spot.
How To Update ARLO Camera Firmware?
An essential component for the Arlo camera to operate correctly is the current firmware. The camera will eventually stop functioning properly if you overlook this factor. That’s why it’s essential that you update the firmware on your Arlo camera. Take the actions listed below to do this:
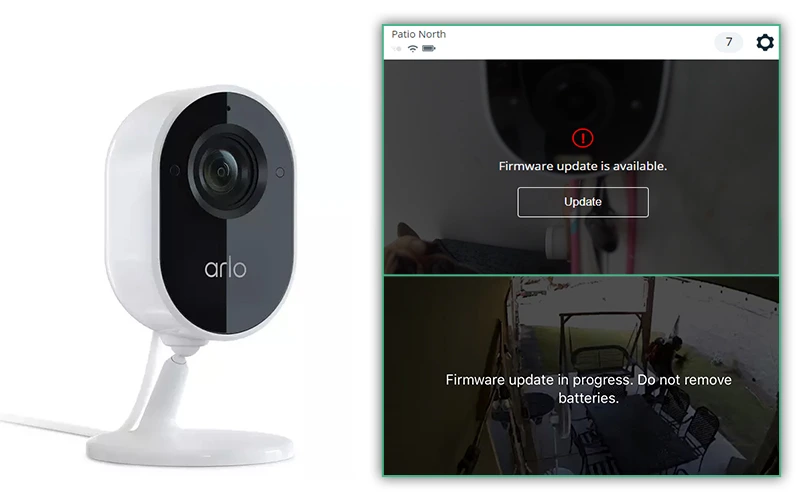
- Start the Arlo application. Another option is to sign in to my.Arlo.com.
- Navigate to Settings and select My Devices.
- Decide the camera model you wish to replace.
- After selecting Device Info, select Firmware, and then click Update. Avoid opening the battery door or taking out the battery while the software is being updated and the Arlo camera is upgrading. Finally, give the Arlo camera firmware upgrades some time to finish. While the update is being downloaded, the camera’s LED alternates between blue and amber.
- During the firmware installation process, the camera’s LED will go out for a short duration. Upon completion of the firmware upgrade, the camera synchronizes with the base station and the LED begins to blink blue.
How To Add an ARLO Camera On Phone?
Follow these instructions to add the camera to the Arlo app only if you have already completed the Arlo security camera setup using the Arlo app.
Steps For Arlo Pro 4 Setup In Easy Way
- Open the Arlo Secure Application.
- Press the Buttons.
- Prior to adding the device, it is crucial to make sure it is selected in the correct location..
- Click the Add Icon button.
- Choose the Cameras.
- Tab Pro.
- Choose between the Arlo Base Station and SmartHub models. Press Continue after Arlo has identified the device if there’s only one installed Arlo SmartHub or Base Station.
- To add a new Arlo SmartHub, select Add New SmartHub if none is already installed.
- To proceed, connect the Ethernet cable to your Arlo Base Station or SmartHub and select Proceed.
- Check to see that the Arlo SmartHub or Base Station’s LEDs are lit up before plugging the AC adapter into the wall outlet and select Continue.
- If you’re experiencing difficulties setting up the Arlo Base Station or SmartHub, go to: What should I do if, during installation, Arlo is unable to locate my SmartHub or Base Station?
- After placing the battery into the camera, select Continue.
- Press the latch button and gradually pull back to unlock the battery compartment.
- After inserting the battery as directed, shut the battery door.
- On the camera, hold down the Sync button for approximately two seconds before releasing it.
- Click Proceed when the camera’s blue LED begins to blink.
- Arlo will start scrounging for your video device.
- Note: When performing Setup Arlo Camera, make sure it’s 3 to 6 feet away from your Arlo SmartHub or Base Station. To prevent signal interference during the setup procedure, keep the camera away from other Wi-Fi devices.
- Tap Manually Pair Device if the search is taking too long. On the camera, press the synchronization button and select Continue.
- Tap Continue after giving your Arlo camera a name.
- After positioning your Arlo camera, press Continue.
- Hit “Finish.”
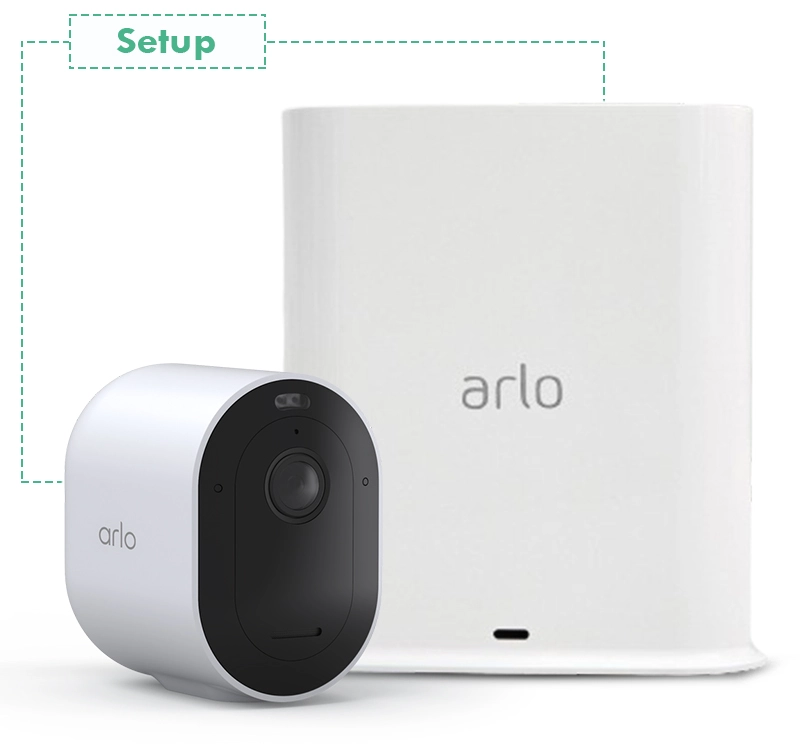
How To Setup ARLO Camera Base Station?
Arlo security cameras are getting more and more popular for usage in homes and businesses. These cameras are growing in popularity among consumers because of their many features. Arlo security cameras are among the best available today. Though their exceptional performance is well known, they are additionally known for being exceptionally simple to set up and install.
Your smartphone may be swiftly connected to your Arlo cameras by installing the Arlo app from the Play Store. If you have bought a new Arlo camera package for your house and need help setting up the Arlo base station, this blog might be the most beneficial option for you.
- Disassembling the Arlo base station and its cameras is the first step in setting up the Arlo base station.
- Prior to use, make sure the cameras are completely charged.
- Install the Arlo app on your smartphone after downloading it.
- Create an Arlo sign-in account and register for it.
- Connect the central administration to your wireless network router using an Ethernet connection.
- The base station requires a connection to an electrical outlet.
- To synchronise every camera with the base station, utilise the smartphone application.
- Anywhere you like, set up the cameras.
- Changes to the camera settings can be facilitated via the Arlo application.
- You can now use your Arlo security camera with its basic configuration complete.
Conclusion
We hope that this tutorial has helped you to successfully set up the Arlo camera on your own. If you have friends or family who recently bought an Arlo camera, you might forward them this piece of content, if they are looking for how to setup arlo cameras. Don’t hesitate to contact our professionals, who are renowned for providing solutions quickly, if you are having trouble setting up Arlo even after following all the instructions. Not only will they diagnose any issues you are having with the Arlo Security camera setup, but they will also provide you with ongoing support to ensure everything goes well.